Easy Butterfly Origami

My new book, Easy Butterfly Origami features 30 bold full-color patterns designed to accurately portray the dorsal and ventral sides of some of the most beautiful butterflies from around the world!

Origami Folding Tips

Origami, from the Japanese ori (to fold) and kami (paper), began in the 6th century when Buddhist monks introduced paper to Japan. The print-and-fold crafts and easy diagrams are designed to help children with fine motor skills, directions and hand eye coordination. Some basic origami folding tips:
  • Print and cut out patterns carefully.
  • Fold with clean, dry hands.
  • Follow the instructions. Study the diagrams and be patient.
  • Be precise: fold each crease well, flattening the creases by running your fingertip over the fold.
  • Folding the paper away from you is easier than folding towards you.
  • Be creative...use your origami on greeting cards, holiday decorations, table place cards and bookmarks.
Showing posts with label ocean. Show all posts

Color and Identify: Hawaiian Intertidal Zones

What will you see at the rocky shore?

Hawaii's intertidal zone is home to a variety of plants and animals that are well suited to the push and pull of tides. When the tide is low, rocks are exposed to the hot sun. Shellfish hug the rocks to keep moisture in. Some snails even have an operculum, a "door" that closes shut to prevent them from drying out. When the tide is high, rocks are submerged and fish, mollusks and other creatures emerge from crevices and hiding spots under rocks, free to roam. Some animals even prefer the spray zone, where waves constantly pound the shore.

Plants and animals living in the intertidal zone must also adapt to drastic changes in temperature and the level of salt in the tide pools.

Tide pools can be fun, but you must use caution when exploring. Always wear protective foot covering. Rocks can be slippery, so watch your step. Beware of animals, like urchins, that can be venomous. Avoid stepping on and destroying plants and coral. If you overturn a rock, replace it the way you found it so that the plants and animals beneath the rocks aren't exposed to sunlight and drying out. And NEVER turn your back to the waves! Always be mindful of the sea and all its creatures.

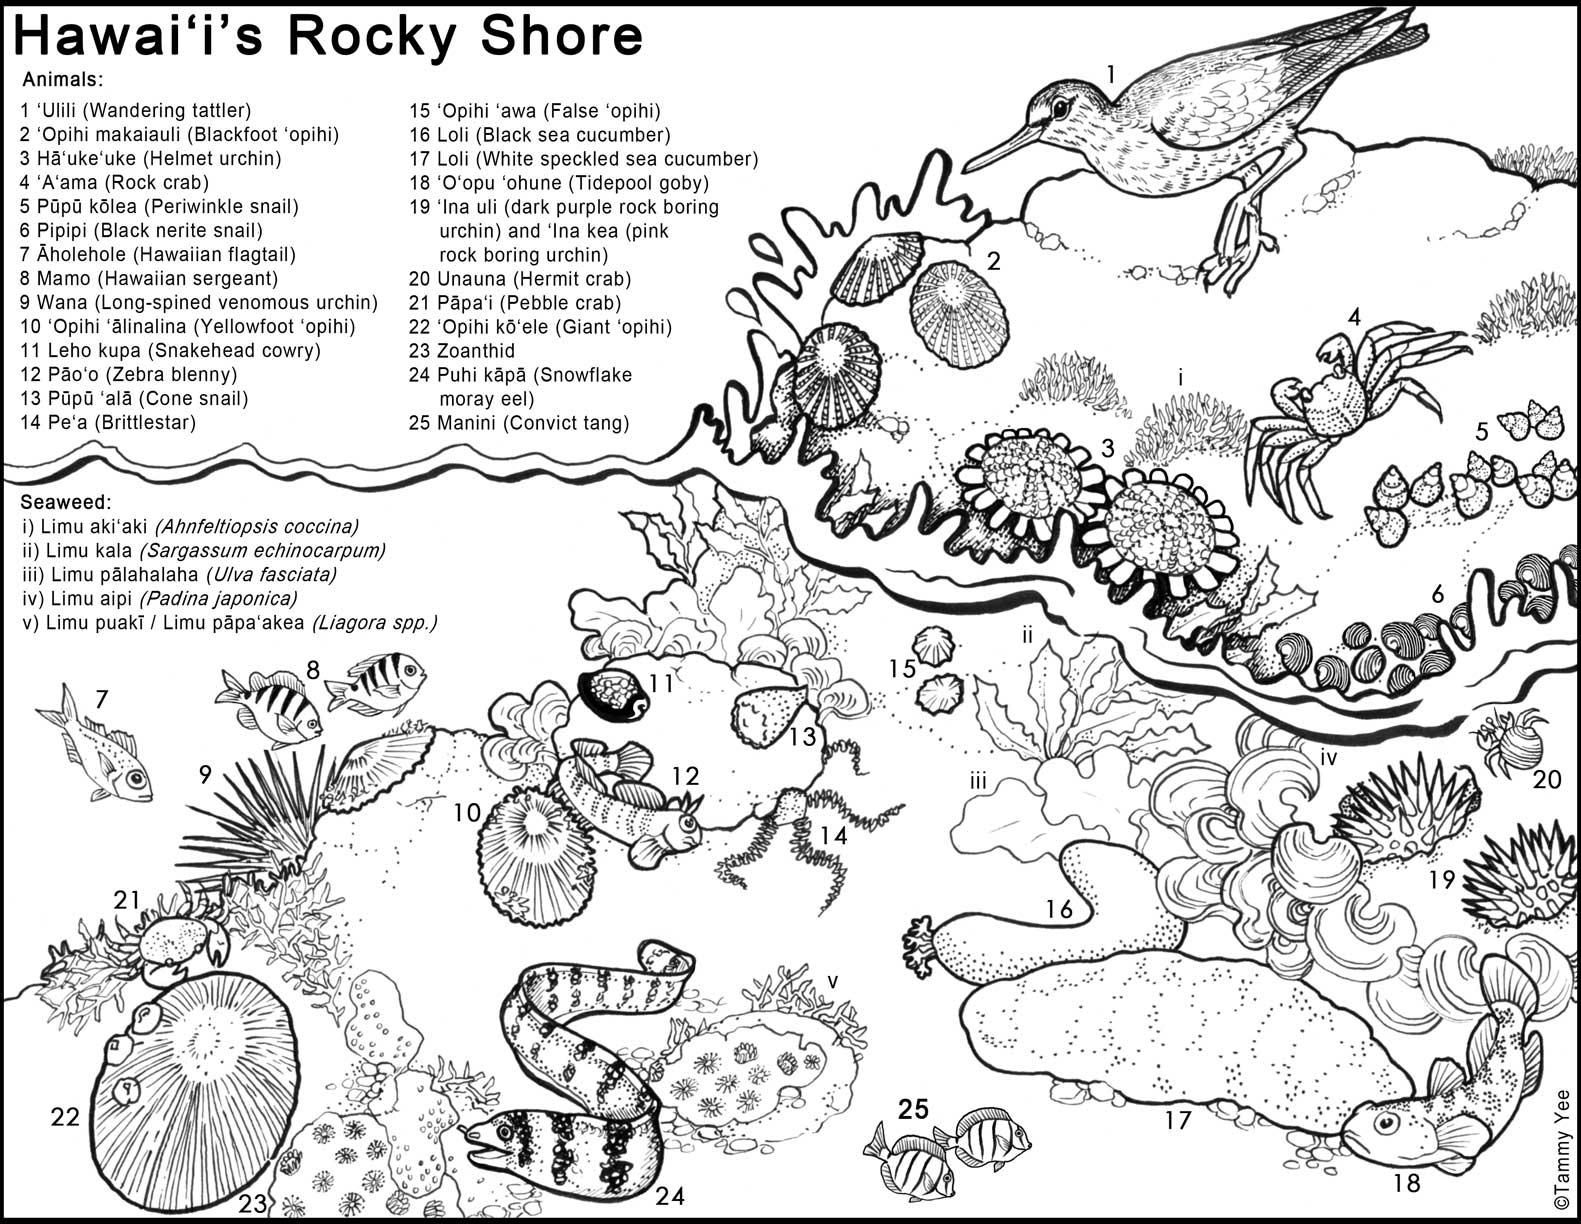
Print and color this identification sheet of Hawaii's rocky shore:


Hawaiian 'Opihi Origami

'Opihi are limpets that live on the shores of Hawaii. With their cone-shaped, squat shells, they can withstand the mightiest waves as they cling tightly to the rocks.

'Opihi have long been considered an essential part of a Hawaiian luau—'opihi pickers risk their lives to collect these prized delicacies and are sometimes swept out to sea. However, overharvesting has made this native shellfish harder and harder to find. To better understand how we can conserve our 'opihi populations for future generations, scientists have been working hard at learning about the 'opihi's life cycle, and enlisting the vital help of local communities to develop plans that will ensure that our coastlines are preserved for future generations.

There are three species of 'opihi. 'Opihi Makaiauli (blackfoot 'opihi) is found in clinging tightly to rocks in the splash zone, and can tolerate being exposed to the sun during low tides. 'Opihi 'ālinalina (yellowfoot ʻopihi) have shells with jagged edges that were used by Hawaiians as scrapers for shredding coconut meat. These need moisture, and are found in the most dangerous tidal zones where there is constant wave action. ʻOpihi kōʻele (giant or kneecap ʻopihi) is found submerged in water, and can grow up to four inches across.

PRINT AND FOLD IKI, THE LITTLEST ʻOPIHI ORIGAMI


DIRECTIONS:

1. Print Iki, the Littlest ʻOpihi origami. Cut out image along outer solid lines.

2. With printed side facing up, fold down on solid line. UNFOLD.


3. Turn over, so that the printed side is facing DOWN.
4. Fold along diagonal line as shown. UNFOLD.

5. Repeat diagonal fold on the other side. UNFOLD.

6. Your 'Opihi Origami should be creased as illustrated.

7. With printed side down, fold down, forming a "tent" along the creases.

8. Fold body up along solid line.

9. Tuck tapered end of body into shell.


Origami based on:
Iki, The Littlest 'Opihi
2nd Edition
Written and Illustrated by Tammy Yee
Windword Books 2013
ISBN: 978-1493657971

'Opihi are shellfish that live clinging to the rocky shores in Hawaii. But Iki, the littlest 'opihi, seeks adventure in the open ocean. Will he ever join the other 'opihi and learn to "stick to it"?


©2013 Tammy Yee


Coloring for Kids: Whales' Tails and Turtle Trails

Print and color this page from the children's book, Whales' Tails and Turtle Trails by Tammy Yee.


Whales' Tails & Turtle Trails
Written and Illustrated by Tammy Yee
Island Heritage Publishing, 2010
ISBN 1-59700-928-8

Go on a dreamy adventure with Turtle as he explores the ocean and the wondrous creatures that inhabit it. Turtle is joined with his friend Seal and together they encounter many delights along their travels. Children will enjoy the rhyming prose and vibrant illustrations throughout this charming board book.


Most Helpful Customer Reviews

By sierra on January 23, 2011 
This book was an excellent investment, a book that I could read over and over again. We have enjoyed this book so much we are searching for more by the same illustrator and author. At first my son was captivated by the colorful and enchanting illustrations; then he grew into the activities on each page, from finding shapes in the clouds, to counting fish. We also enjoy following the different sea creatures on each page including turtle, seal, fishes, dolphin, and whale.


another great book for kids by Tammy Yee
Books by Tammy Yee always delight. This is another great book for little kids, filled with imaginative text and illustrations.


Origami: Boy's Day Carp, Koi Nobori

Celebrate Boy's Day (May 5) by folding a koi origami for every male in the household!

Difficulty: Medium


Koi-nobori Origami
Print a blue Koi-nobori

Koi-nobori Origami
Print a red Koi-nobori

Koi-nobori Origami
Print a green Koi-nobori


Directions:

1a. Print and cut out origami along outer solid lines.
1b. Snip end of tale, as illustrated, to black dot.

Koi-nobori Origami


2a. Turn paper over. With printed side facing down, fold along line A as shown.
2b. Repeat fold along line B.
2c. Fold up along line C.
2d. Fold up along line D.

Koi-nobori Origami


3a. Fold in half, along diagonal line, as shown.
3b. Your origami should look like this, with a "tail" flap and a "head" flap.

Koi-nobori Origami


4a. Unfold "tail" flap. Take note of the diagonal line, highlighted here in red, on the carp's fin.
4b. Folding "tail" flap first, crease carp's fin along the highlighted line as you fold "head" flap over.
4c. Your origami should now look like this, with the fin folded as shown.

Koi-nobori Origami


5a. "Valley" fold origami tip inward along line E as shown.
5b. Fold fin up along slit. Your Koi Nobori is done!

Koi-nobori Origami


©2009 Tammy Yee. All rights reserved. May not be reproduced without author's consent.

Crafts: Boy's Day Kite, Koi Nobori

Make a Koi Nobori, a Boy's Day carp kite on May 5th. Traditionally, a koi is flown for every male in the household, with the largest carp on the top representing the father.


Directions
1. Select your koi, print, and cut along outline.

2. Fold your koi in half along the vertical line, and glue along top, leaving the "mouth" open.

3. Use a hole puncher to punch holes to either side of the mouth, and attach strings.


©2009 Tammy Yee. All rights reserved. Do not reproduce or alter without author's consent.

Origami: Humpback Whale


Difficulty: Easy

Directions (use same directions as for dolphin):


1a. Print and cut out origami and dorsal fin.
1b. Snip end of tale, as illustrated, to red dot.


2a. Turn origami over. With printed side down, fold along A as illustrated.
2b. Repeat fold along B.
2c. Fold along C.
2d. Fold along D.


3a. Fold in half, diagonally along F, as illustrated.
3b. Your origami should look like this, with a "tail" flap and a "head" flap.


4a. Unfold "tail" flap. Take note of the diagonal line, highlighted here in red, on the dolphin/whale's flipper.


4b. Folding "tail" flap first, crease dolphin's flipper along the highlighted line as you fold "head" flap over.


4c. Your origami should now look like this, with the flipper folded as shown.


5a. "Valley" fold origami tip inward along E as illustrated.
5b. Fold dorsal fin in half, along solid line, as illustrated.


6. Fold tail fluke down. Tape/glue dorsal fin into place. Your marine mammal is done!


©2009 Tammy Yee
All rights reserved.
No portion of this website may be reproduced without the prior written consent of the author.

Origami: Sea Otter

Sea otters are one of the few mammals, aside from primates (monkeys and apes), to use tools. Floating on the surface of the water, they sometimes place a rock on their chest, using it as a hard surface to smash open shelled food like clams and abalone. Have you ever wondered how otters carry all that stuff to the surface? In their armpits! Try that with an urchin--better yet, don't try it. Learn more about otters...


Difficulty: Easy


Directions:


1. Print and cut out Origami Otter along outer solid lines.


2. With printed side facing down, fold up along red diagonal line 1.


3. Turn origami over. Fold down along diagonal line 2.


4. Turn over. Your Origami Otter should look like this:


5. Fold otter head up along line 3.


6. Fold otter hind legs and tail up along line 4.


Your otter is ready for a swim!


©2009 Tammy Yee
All rights reserved.
May not be reproduced without permission.


Copyright ©2009 Tammy Yee
All rights reserved. No portion of this web site may be reproduced without prior written consent.